1. Preflight Checklist
Before you get started, make sure these five things are ready:
- You have your license key in format
NEXUS-XXXX-XXXX-XXXX-XXXX. - Your target platforms are signed in at least once manually (LinkedIn and/or Indeed).
- Your resume PDF is finalized and saved locally.
- If using the built-in AI, 6GB+ free RAM is recommended for lightweight models.
- You know your daily application limits for each platform.
Goal: get one successful end-to-end application first, then scale volume.
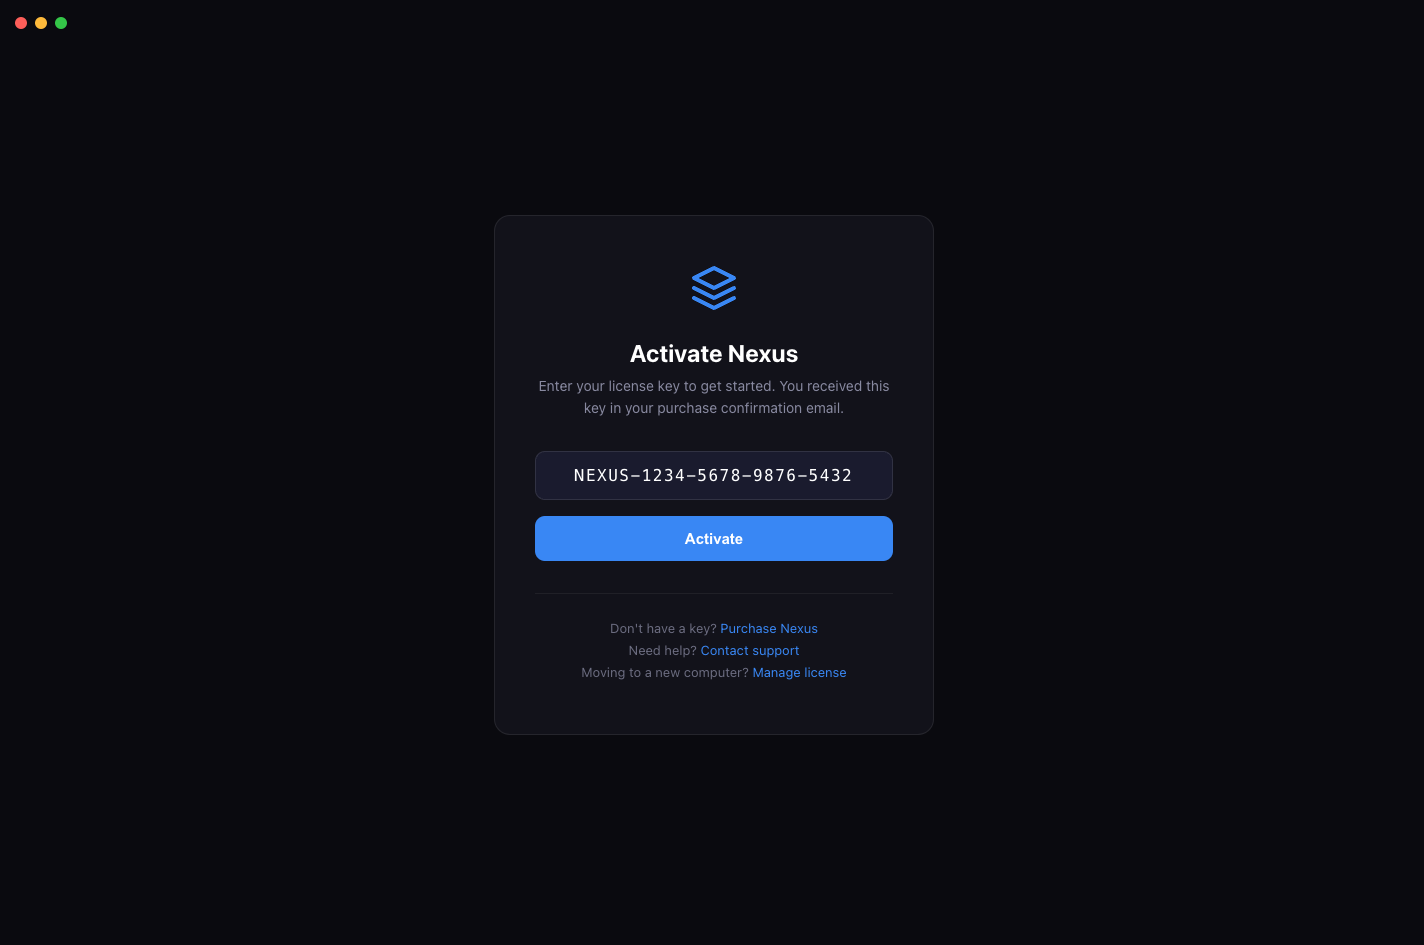
2. Install + Activation
- Download the latest Nexus build from the beta channel.
- Install and launch the app.
- Paste your license key on the activation screen and click Activate.
- If activation fails: verify internet connectivity and retry once.
Once a machine is activated, you usually will not need to enter the key again unless you move devices.
3. AI Setup
Option A: Built-in AI (Recommended)
Nexus includes a built-in AI runtime. This is the default and fastest path for new users.
- Open Settings → LLM Settings.
- Select provider:
Nexus Built-in (Recommended). - In the Model Manager section, click Download on your preferred model:
- phi-3-mini (~2.3 GB) for lightweight systems.
- qwen2.5-7b (~4.7 GB) as the recommended text baseline.
- qwen2-vl-2b-visual (~2.4 GB) for external apply recovery.
- Once downloaded, click Start to launch the local server.
- Click Test Connection to verify.
Built-in text + visual runtimes can auto-start on demand once models are downloaded.
Option B: Ollama / LM Studio
- Use this only if you specifically prefer your own local runtime.
- Install Ollama or LM Studio from their official sites.
- Download
qwen2.5-7b-instruct(or your preferred model) and start the local server. - In Nexus Settings, switch provider to
OllamaorLM Studio. - Use
http://localhost:11434/v1for Ollama orhttp://localhost:1234/v1for LM Studio.
Option C: OpenAI / Anthropic
- Set provider to
OpenAIorAnthropic. - Enter your API key. Job descriptions will be sent to the cloud provider.
Verify connection
- Click Test LLM Connection in Settings.
- Expected result:
Connected! Model: ... - If it fails, read the returned endpoint and status message carefully.
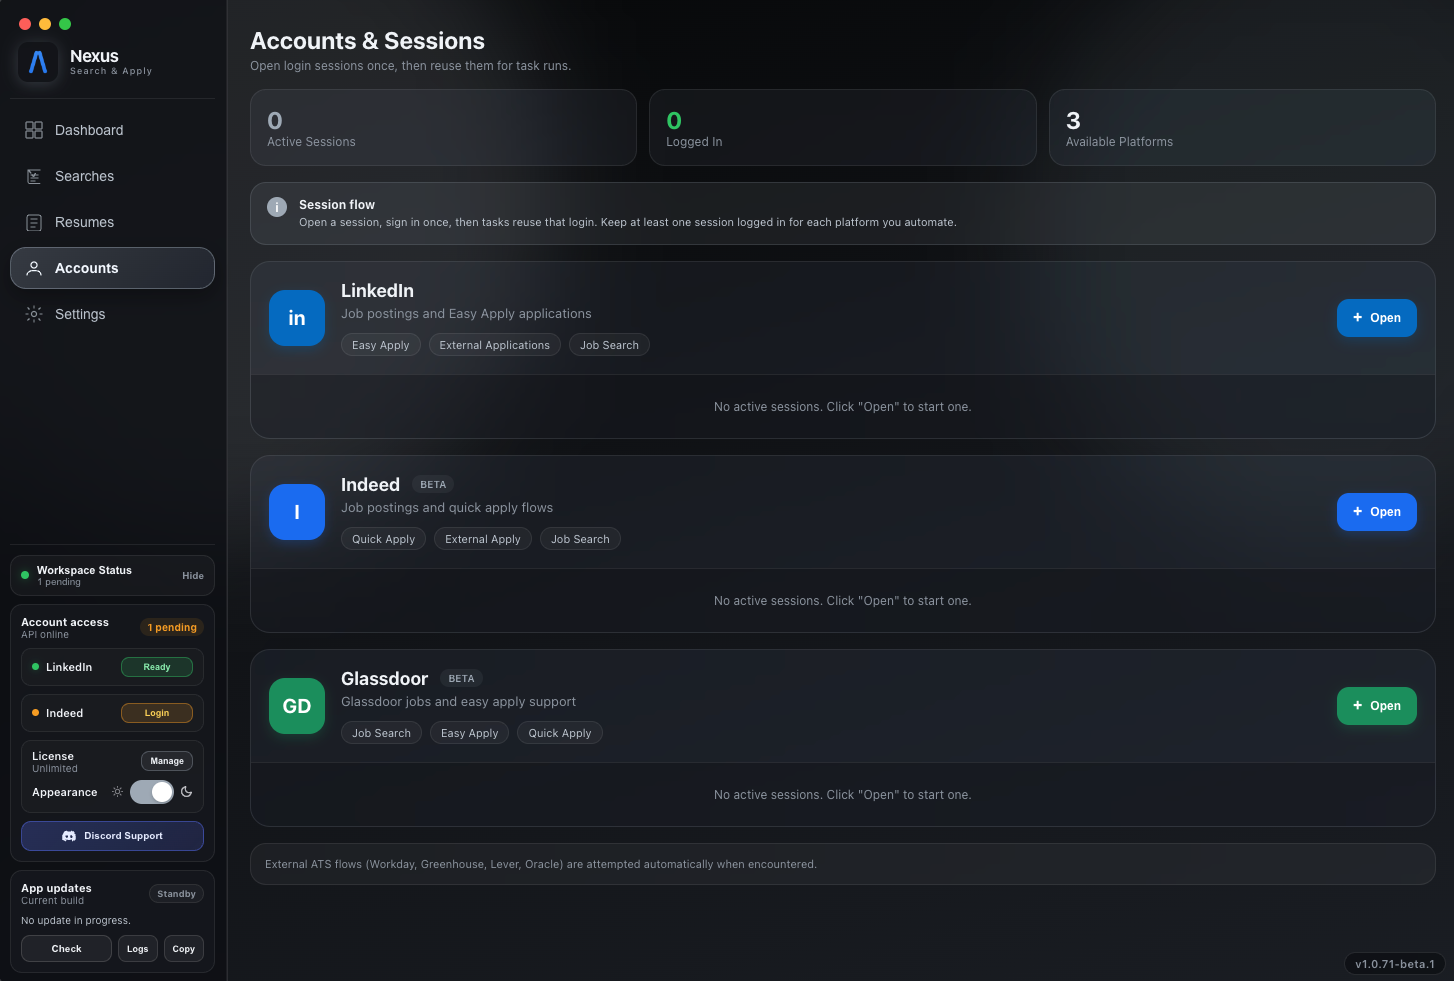
4. Job Site Sign-ins
Use the Accounts page in Nexus to verify platform sessions before running searches.
- Open the LinkedIn session window and sign in.
- Open the Indeed session window and sign in.
- Refresh status inside Nexus until each shows connected.
If Nexus says a site is not signed in, refresh that session once from the Accounts page before starting again.
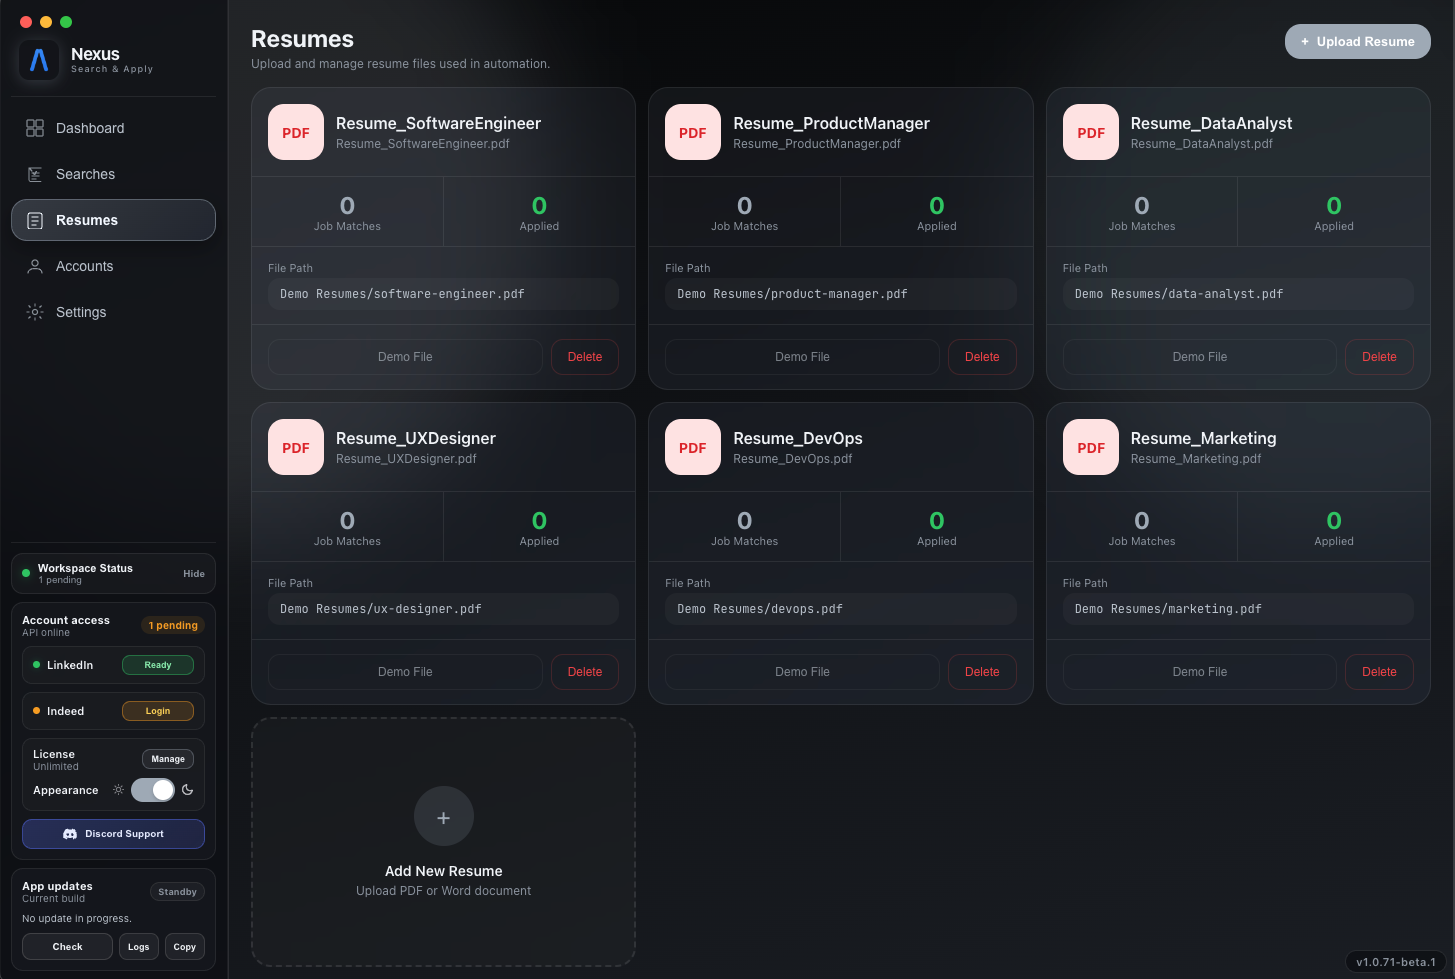
5. Resumes + Profile Defaults
- Upload your resume in the Resumes tab.
- Confirm the file path via “Open location” when needed.
- Set defaults for location, work authorization, phone, and work links.
- If available in your build, set demographic defaults carefully.
For consistent outcomes, keep one primary resume per search and avoid switching mid-run.
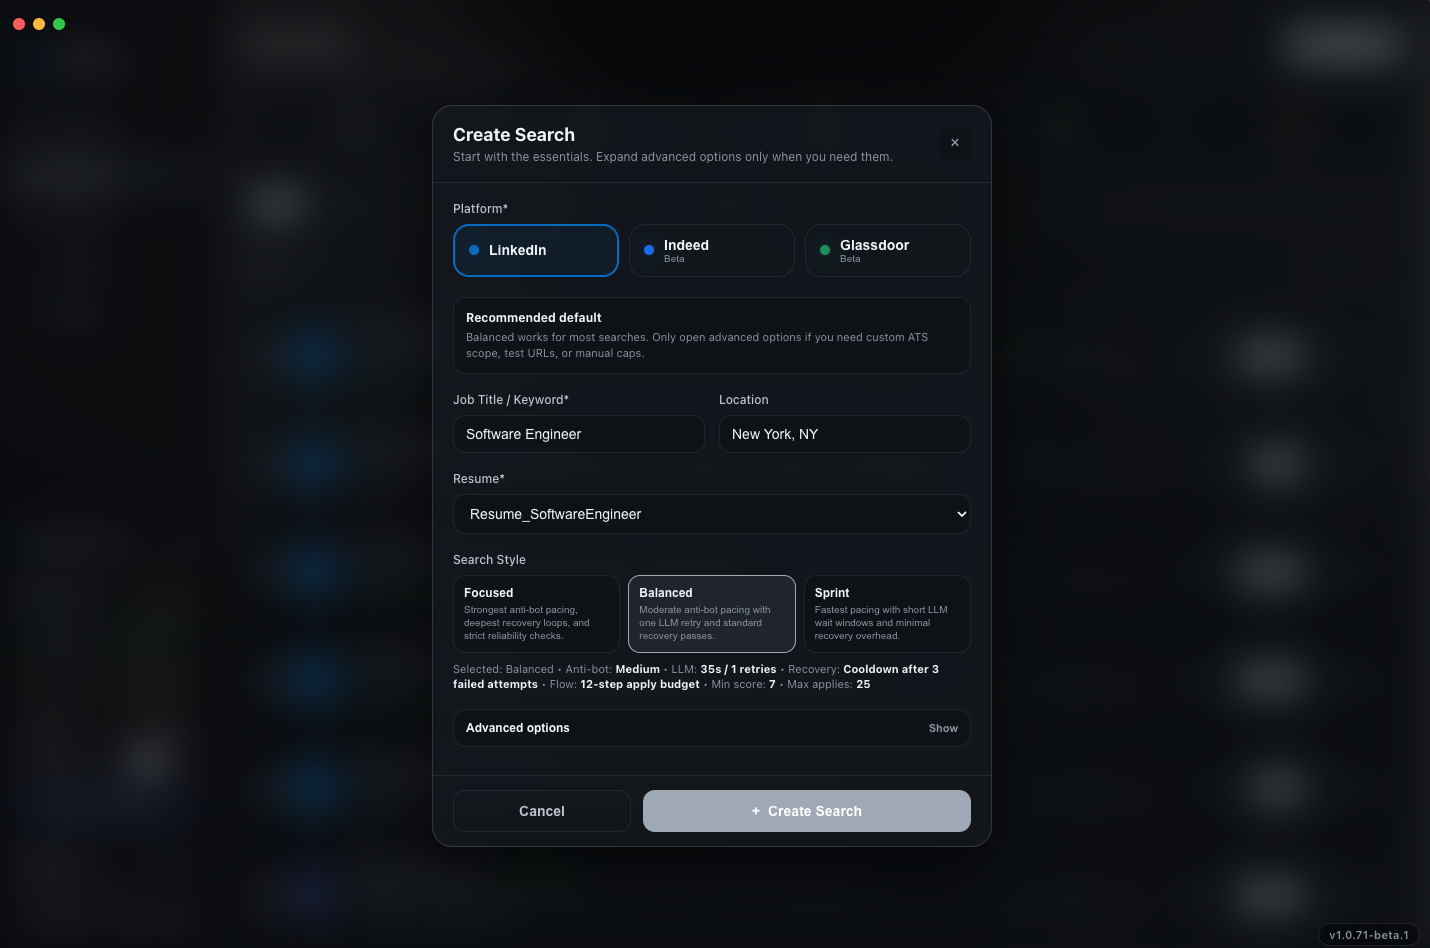
6. Create Your First Search
Baseline search recipe
- Choose site (LinkedIn or Indeed first).
- Add keyword + location.
- Select a resume for this search explicitly.
- Set minimum match score (for example:
7.5 / 10). - Set a daily application limit (for example:
10for calibration). - Set Search Style to Balanced (Recommended).
Good first-pass defaults
- Start with required fields plus one resume.
- Use Balanced Search Style for most first runs.
- Leave advanced options collapsed until the first stable run.
- Keep the daily limit low until the first run is stable.
7. Watch the First Run
- Start one search and watch the first 2 to 3 applications closely.
- Confirm question-answering behavior across text, dropdown, and radio fields.
- Check activity logs for applied, skipped, and failed counters.
- Review the post-run summary and adjust thresholds.
After one stable run, scale to more pages and higher daily limits.
8. Troubleshooting
LLM test shows “connection failed”
- If using Nexus Built-in: ensure a model is downloaded and the server is started.
- If using Ollama: verify the server is running and the model is loaded. Use
http://localhost:11434/v1. - If using LM Studio: verify the server is running and a model is loaded. Use
http://localhost:1234/v1. - Leave the model field blank for auto-select or use the exact model ID.
Captcha interruptions
- Invisible reCAPTCHA: sign in to the trusted account and retry.
- hCaptcha: complete the challenge manually when prompted.
Easy Apply rate limits
- If rate-limited and the search is Easy Apply only, stop it and retry the next day.
- If external apply is enabled, skip easy applies and continue with supported external flows.
Form question validation failures
- For numeric-only fields like GPA, avoid text responses.
- For required dropdown or radio fields, ensure defaults include location and authorization context.
9. Scale Up Safely
Once your first search is clean:
- Run small batches, validate quality, then scale volume.
- Keep one known-good config profile as a fallback baseline.
- Log unsupported domains and prioritize modules by frequency.
- Rotate between high-quality keywords instead of broad scraping.
- Review post-run outcomes daily and tune thresholds weekly.
Quality beats quantity. Higher acceptance and fewer platform flags come from controlled pacing.
10. Get Help
If you need help with a run, include these artifacts in your report:
- Search ID and timestamp window
- Relevant search logs
- Target URL and platform
- Screenshot of the blocking UI state
Contact support at Hyperfectllc@gmail.com and include “Nexus Beta Support” in the subject line.